
Grilling season is now well upon us. But do you have everything you need to rule your next BBQ?
Barbecuing is the one area where I can feel a bit more confident about recommending a fair deal of stuff. I mean, c’mon, grilling is a manly rite of passage. You can’t just half-ass it, amirite?
That being said, I am still a minimalist when it comes to cooking, and I don’t have the kind of funds necessary to throw everything but the kitchen sink at it.
I’m a guy that likes to do his research. And I think I’m fully stocked with the gear that will give me the most value for this summer’s Grill-a-Palooza, so I thought I’d give you the low-down with my thoughts. I’ve linked everything up to Amazon in case you’d like more information or would like to order.
Before I get into it, I want to give Meathead from Amazing Ribs mad props. His site is the barbecue bible as far as I’m concerned, and you’d do best to check it out. This is one guy whose reviews I trust and I have built up my arsenal accordingly.
The Grill
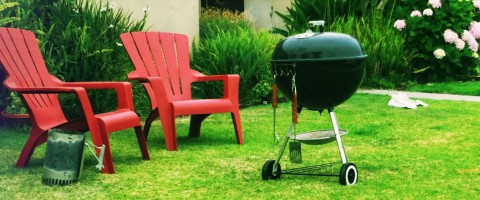
The Weber One Touch grill belongs in a museum of modern art. Seriously. This classic kettle is what most people think of when they picture a cookout.
After decades of little to no change, it is still the best-selling charcoal grill. And for good reason: it is relatively cheap, and it does an excellent job.
The kettle shape is great at keeping the temperature consistent, cleanup is easy with the attached ashtray, and it is well-suited to different modifications (but more on that later). Weber also makes covers to protect the grill from the elements, which I have as well.
One quick note on gas grills here. Nowadays they are more popular than charcoal by far. And although I like to make fun of them (why don’t you just use the oven if you’re afraid of a little fire? ;-)), the truth is they are still a great option as long as you get a good one.
With gas grills, you have more control and it is easier and quicker to get it going. The big thing you miss out on is that they don’t get nearly as hot as charcoal, which means that searing the outside of your food is much less effective.
I like charcoal grills because they are a much more “primal” cooking tool. I just feel like more of a caveman when I use them. They are more difficult to master, but you automatically establish yourself as a superstud if you are up to the task. Oh, and they tend to be cheaper than their gas counterparts. Score!
But if you are looking to become a backyard pitmaster, don’t feel that you need to stick with charcoal. Just find something that works for you. For those of you up to the challenge, the Weber One Touch is probably the way to go.
The Fuel

A grill is no good if you have no fuel. Although many different types and brands of charcoal exist, I usually stick with another classic: Kingsford briquettes.
Chunk charcoal is becoming more popular, and are better for getting high heat than briquettes. But briquettes are easier to start, burn more uniformly, and don’t fall through the grate as easily.
Kingsford briquettes are the choice of the pros, as they are consistent from batch to batch and allow you to get a better intuitive grasp of how much you need over time. They are also available practically anywhere, and are easier to find on sale than other brands.
You might not think the charcoal really matters, but for consistency and ease of use Kingsford briquettes are hard to beat.
The Firestarter
Cue flashbacks to the mid-90’s and Prodigy’s classic song “Firestarter.” You had to be there…
Pile a bunch of coal into a pyramid. Douse it with starter fluid. Toss a match in and watch it flame up. Go back out to the grill in ten minutes and see that none of the coal is burning. Repeat this process three to five times. Get an hour behind schedule and up eating food that tastes ever-so-slightly of lighter fluid.
No thanks, not for me.
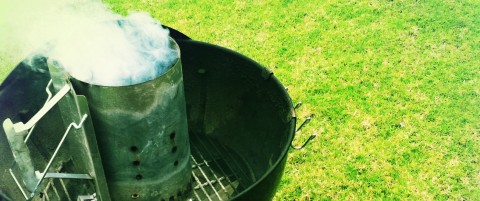
The best way to get your charcoal going is to use a chimney starter. Fill it up with coal, stuff some newspaper underneath it, light a match and let ‘er rip. Head back out to the grill 15 minutes later to coals that are ready to grill. Seriously, it works like a dream.
Chimney starters are really fast, they get your coals consistently hot, and they avoid using any lighter fluid. It’s a win on all counts.
Weber shines again here and makes a very sturdy chimney starter. It’s what I use.
The Essential Tools of the Trade
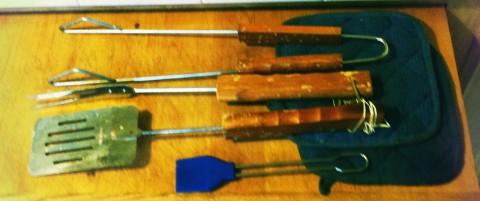
You’re going to need some good tools for playing with your food when it’s on the grill. There are many sets that include a long spatula, tongs, and a meat fork. Leave the meat fork in the kitchen for carving up your roasts. Don’t be the guy stabbing steaks to flip them over. You risk losing all the juices through the holes and drying them out.
Weber also makes a nice tool holder that goes on the lip of the grill to hold everything within easy reach.
Another couple of things you’ll need are gloves or pot holders, a brush, and a hinged cooking grate.
I just use the potholders from my kitchen for transferring coals from the starter to the grill, but you might want to consider getting a pair of gloves specifically suited for the task. They have better coverage and you can get them dirty without much worry.
I’ve had a silicone brush forever for basting food. They’re easier to clean than regular bristle brushes and will last longer as well.
Hinged cooking grates are crucial if you are going to be doing slow and low cooking for a lot of food. Instead of needing to take an entire grate full of food (or two, if you include a Hovergrill) off to replenish the coals, you can just flip up the end and put more in without disturbing anything. Nice!
If you like grilling veggies (as I do), you should pick up a set or two of kebab skewers.
Thermometers
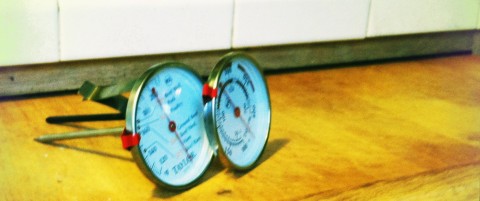
If all you’ll be grilling are burgers, brats, and hot dogs, you can probably get away without a thermometer. But if you want to make steaks and do ribs and slow-cooked roasts, you absolutely positively must have two of them: one for the grill and one for the meat.
With a grill thermometer, you can make sure you don’t burn the outside of your food before the inside is done, or spend all day and all night cooking because the temperature is too low. With a meat thermometer you can make sure you aren’t serving potentially undercooked food or ruining a steak by burning it to a crisp.
I use these two thermometers, and they are a cheap and easy way to get you started. They come with a big caveat, however: they are notoriously inaccurate.
One way to get around this is to calibrate them before you use them. Get a pot of water boiling and take the temperature. At sea level, boiling water is always 212°F. If your thermometer reads 202°F, for example, you know that your thermometer is reading at 10°F below the actual temperature and can adjust accordingly.
I’ve found that these thermometers can still be a little dicey, but they are certainly better than nothing. If your food is taking an excessively short or long time to cook, you can figure that your grill thermometer is off.
One other tip might be to get a set of really good thermometers. I am personally lusting after this thermometer, which uses two probes: one that you keep in your meat and one that you keep in the grill. It is very accurate and comes with a digital monitor that you can bring with you in the house to keep an eye on everything from afar. I might still purchase this thing this summer sometime.
Smokenator and Hovergrill
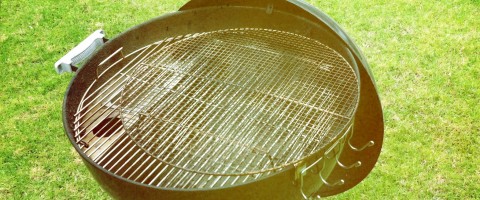
This is where the Weber grill shines again. Being such a prevalent model, lots of people have created “mods” to turn them into everything from a fire-brick oven for making pizza and attachments that turn them into smokers. You can go the DIY route and make these things yourself, or you can also simply purchase them.
The Smokenator and Hovergrill are absolutely killer. The Smokenator is an attachment that turns your grill into a smoker by isolating the coal and using a small water tray to stabilize the temperature and humidity for slow and low cooking (but it has nothing to do with the bodybuilder/movie star/politician you may be thinking of).
The Hovergrill is a separate grate that you place on the top grate to let you add more meat to the grill. With the combination of the added grate and the Smokenator you have 547 square inches you can use for grilling, and that isn’t even including the room available on the bottom grate if you want to use it. I personally have used these two to barbecue a whole chicken and three racks of ribs at once, so you definitely can make a big cookout with all of this.
Although you certainly don’t need these two attachments to get started, it’s cheap enough and does enough to make this a truly awesome addition.
Things I Want (and May Still Get)
Above I pointed out the thermometer and grill gloves I’d like to get still sometime this summer. There’s a few other things that have piqued my interest that might get a new home here soon.
- Rib Rack – The Hovergrill already gets you lots more space for ribs, but if you’d like to cook them on the bottom grate as well (or you just want to use them instead of the Hovergrill), you’ll want to pick up a rib rack.
- Cedar Planks – I’m a big salmon fan, and cedar planks are a classic way of preparing them on the grill. Soak a plank, toss the fillet on top, and put it all on the grill. The cedar gives off its characteristic steam, which soaks into the fish.
- Bear Paws – I love pulled pork. Shoulders are cheap, they’re pretty low-maintenance to grill… but pulling them can be a big pain. Bear paws are supposed to make the job much easier and can also be used to transfer large roasts from the grill.
That about does ‘er. My relatively cheap barbecue setup that can tackle just about any task. Is there any gear I’m forgetting about that you’d suggest?
 I'm a science geek, food lover, and wannabe surfer.
{ 7 comments }
You are becoming a master at this grilling deal! I know that around here when it comes to meat, the best options are found not in the supermarket, but rather at the mom and pop butchers. Cheaper meat for the same quality.
-Sam
Darrin,
Very informative post, especially for grilling newbies out there. This covers everything you need to get started and on your way to becoming a master! With all these tools, I’m sure you’ll be cooking up some good stuff this summer!
Alykhan
@Sam
Thanks! I still see myself as a Jedi-in-training. Unfortunately all the butchers out here in Southern California are MORE expensive than the supermarket. 🙁
@Alykhan
That’s my plan, man! We’ll see how it all turns out.
For everyone who doesn’t want to buy (or carry) a chimney starter:
http://www.youtube.com/watch?v=kL-0o7aDRgo
(it’s in german but i think it’s self-explanatory)
At the local university more and more students use this method 😀
@Friedrich
GREAT link man! Thanks for sharing.
Darrin,
Talk about information. It’s finally grilling season here in the great white north. I am a charcoal man myself, but not a master by any means.
I am looking forward to improving my grilling tactics to make more enjoyable meals for my wife and guests!
I just purchased a silicone brush, and will be looking at my first pair of gloves.
Cheers,
Jordan
@Jordan
Awesome. You’re well on your way!
Comments on this entry are closed.