There’s no better place for me to start cooking and eating a whole hog than with the humble pork chop.
The most widely-recognized cut, you’re far more likely to turn it into a dry-as-a-desert failure as it is to cook it right.
That ends today.
Where Does the Pork Chop Come From?
Pork chops come from the loin primal, which runs along the back of the hog.
Chops can either have bone or not. The part of the loin in the rear contains no bones, but those closer to the front of the hog contain the part of the rib bones that connects to the spine.
(The bones in chops are the same as those found in ribs, but just come from higher on the hog!)
This meat is very lean and tender, and is generally prepared fresh, without any curing or smoking beforehand.
Mythbusting
I’m not going to bother giving you a variation on the same damn pork chop recipe you’ll find all over the internet.
You know the one. “Preheat your pan on medium and add cooking oil. Cook the pork chop for five minutes and flip.”
Blah blah blah. You don’t need a recipe for that, you need a kick in the ass. Everyone can season a pork chop and flip it once in a pan.
Instead, I want to make the greatest damn pork chop in the world. One that will bring tears to your eyes and make you question everything you hold sacred in life.
And even better, I want it to be something a working guy can easily throw together after a busy day at work. To do so you need to simply follow this blueprint:
- Brine
- Slow-cook
- Sear
- Rest
But more on those in a minute.
Ingredients and Equipment
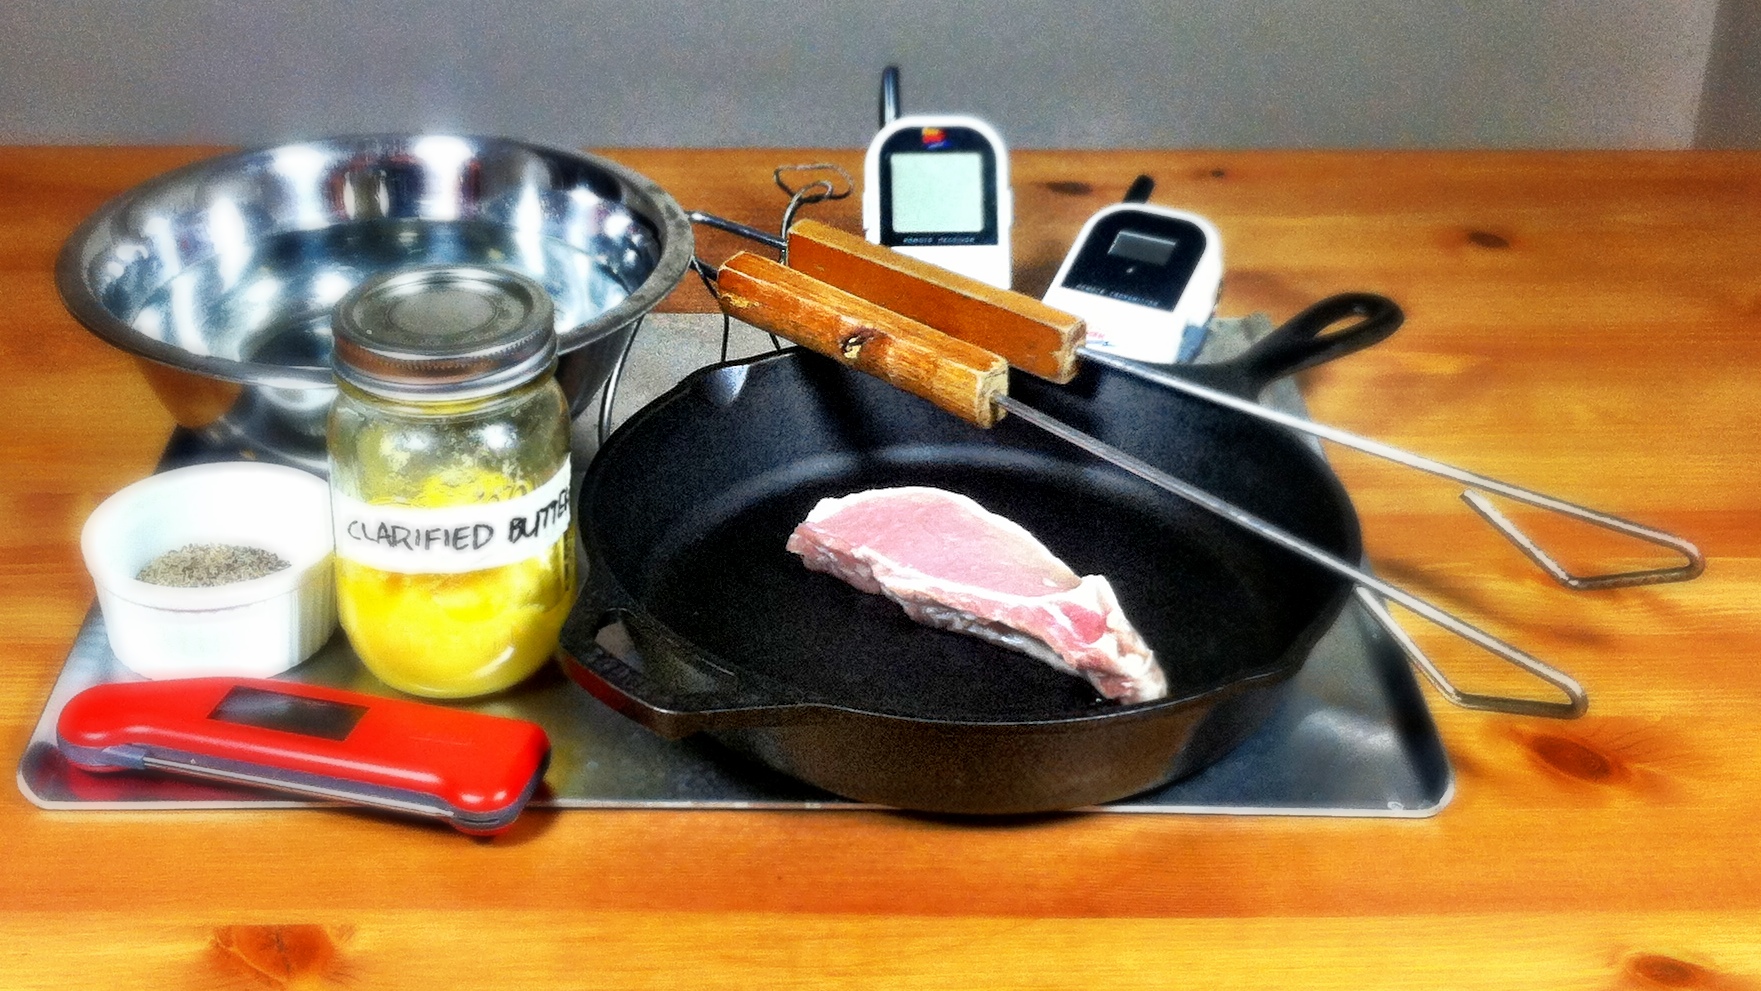
Pork chops require the most basic of ingredients and equipment, which make it a good addition to your list of [go-to meals][11].
- Pork chops–Because duh!
- Brine–For… the brining step.
- Pepper–The only spice/herb/sauce/extra flavoring we’re using. Yeah, you can fancy it up, but don’t bother while you’re mastering the art of the pork chop.
- Peanut oil, grapeseed oil, or clarified butter–You need a fat or oil that can hold up to high-heat cooking.
- Pan–As always, a cast-iron skillet is best.
- Tongs–For flipping the meat.
- A good thermometer (or two)–The home cook’s ace in the hole.
- A Baking Sheet (optional)–For the low-cooking step. You can use the pan in a pinch.
1. Brine
Before you do anything else, you wanna brine your chops.
Brining brings the following benefits:
- It denatures proteins on the surface of the meat, which helps keep it from drying out.
- It helps the meat stay fresh longer (in case you want to cook the chops in a day or two).
- It makes everything tastier!
Since pork chops are very lean, using a wet brine is best, unlike the dry brining you’ll do for beef.
Nothing fancy here, just a simple 5–10% brine made with kosher salt. And no need to brine overnight. Just submerging your chops in brine for one hour is sufficient.
2. Slow-Cook
No, I’m not gonna tell you to throw your chops in a slow cooker, but the perfect pork chop should be cooked in two phases:
- A low-temperature cook to bring the entire chop to a juicy medium rare.
- A high-temperature sear to brown the exterior and bring amazing flavor to the mix.
The reason we do this instead of the typical “flip once over medium heat”’jazz is that it is far easier to get that tasty crust on the outside without drying out the interior.
There are several good ways of doing this first low cook:
- Roasting in an oven is probably the most practical for home cooks (and the way I do it in the video).
- Grilling in a covered grill might take more effort, but will allow you to smoke them as well if you’d like.
- Steaming is a faster method that you can do with extra equipment.
Either way, you want to make sure you’re cooking your chops at around 225°F (110°C). This will ensure a nice, even cook in the interior.
Just stick your probe thermometer into the thickest part of the chop and cook it until it reaches a temperature of 125°F (52°C).
3. Sear
Searing causes a chemical reaction known as the Maillard reaction, which brings delicious flavors to the mix and shouldn’t be omitted.
Unfortunately, searing comes with a lot of baggage in the form of old myths that refuse to die. Let’s address them one by one.
First, you don’t need to sear a cut of meat right away during cooking to seal in the juices. Meat doesn’t work like that.
In fact, it turns out that you get a much more juicy and uniform chop if you sear the meat after you cook it all the way through.
Go figure.
Another myth you need to ignore is the “sacred law” of only flipping once. Contrary to popular belief, flipping your meat about once per minute will both decrease the cooking time and prevent your meat from overcooking below the surface.
Your best bets for the searing a chop are:
- Using the stovetop. Again the most practical method, but make sure you use a cast-iron skillet and preheat it as high as possible for five minutes. You might want to open your kitchen windows as well, folks!
- Using a grill. Charcoal grills can get insanely hot (which is good) but most gas and electric grills struggle here. If you are using a 2-zone setup you’ll provably find that the area above the heat isn’t warm enough after the low-temp cooking.
Depending on the temperature, you should be able to sear a chop in five or so minutes.
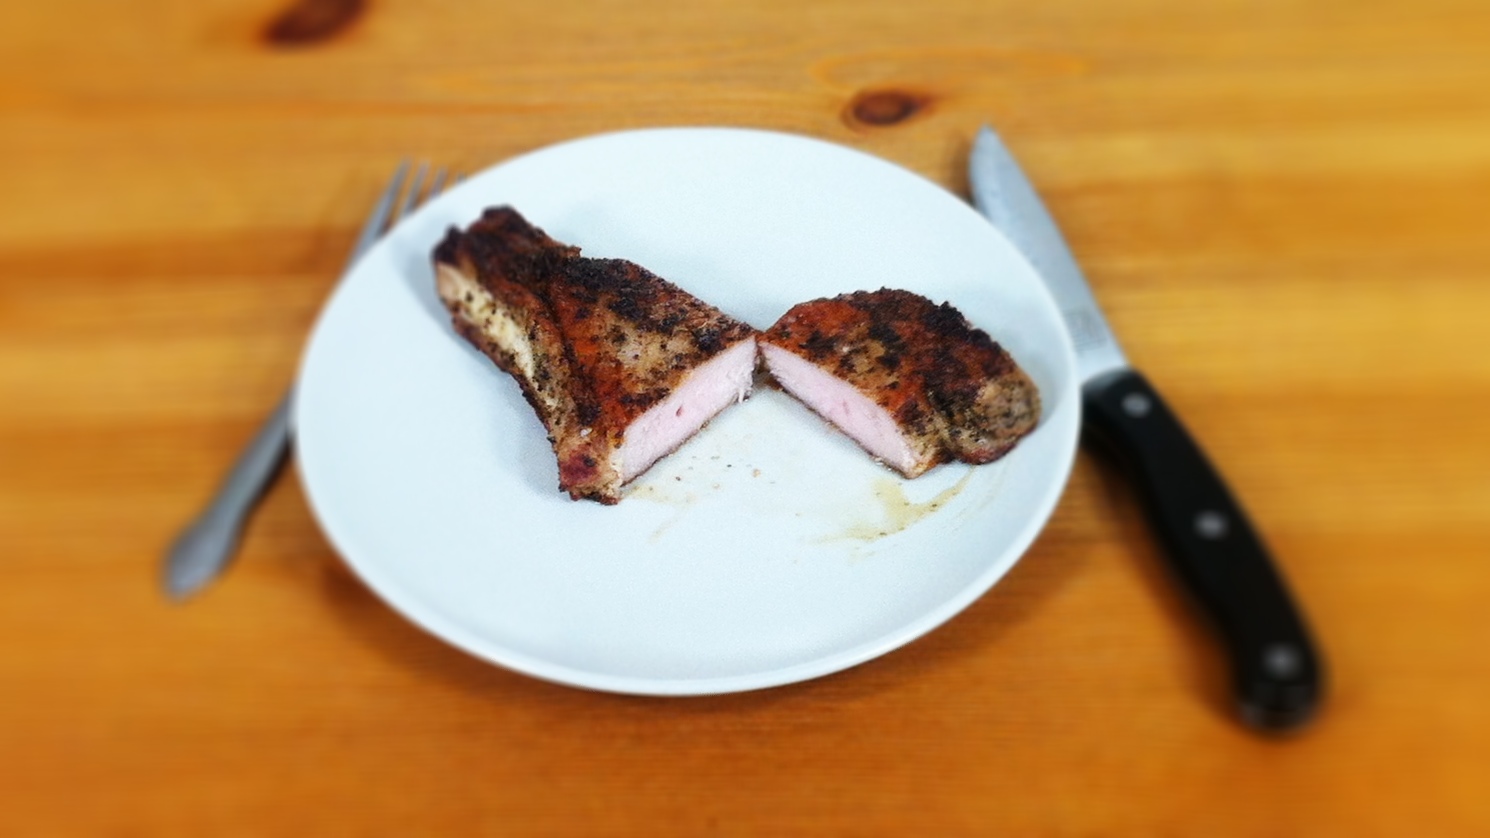
You want to pull the chop off the heat when it reaches an internal temperature of 140°F (60°C).
You used a probe thermometer in the previous stage to cook it to a safe temperature (right?), but you can be extra sure it is done by using an instant-read thermometer like the Thermapen.
The Rest
I know you want to tear into that chop as soon as you take it off, but try to resist the temptation.
By cooling down the meat slightly before serving, you allow the proteins to relax a bit.
This results in a juicier chop that doesn’t spill all its juices out when you cut into it.
Let chops cool down to 120°F (45°C). You can monitor this by using an instant-read thermometer, or just by letting it sit for five to ten minutes.
(I’ve personally found this temp to be a bit cooler than I’d like my food to be, so I dig in a bit earlier, figuring some extra spilled juice is just the price you pay, but to each his own.)
The Jist of It
So, to make the perfect pork chop, just follow these instructions:
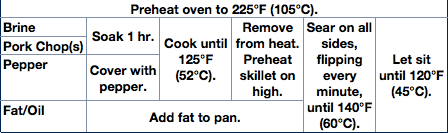
- Soak the pork chop in brine for an hour. In the meantime, preheat your oven to 225°F (105°C).
- Pat the chop dry, sprinkle some pepper on, and cook in the oven until it reaches an internal temperature of 125°F (52°C).
- Preheat a pan on high heat and add oil.
- Sear the heck outta both sides of the chop (and the sides if you’d like). Flip every minute, and remove after it reaches an internal temperature of 140°F (60°C).
- Let the chop rest a few minutes, or until it reaches 120°F (45°C) before serving.
The Perfect Weekday Dinner?
All of the brining, curing, and smoking that go into other cuts of pork make them better candidates for weekend projects, but pork chops are perfect for weekday dinners.
They are quick to cook and adapt well to a wide variety of herbs, spices, and sauces, so they never get old.
To make it even faster, I’d suggest brining the chops as soon as you bring them home. Brined chops will last longer, and will therefore cut even more time off your weekday rush to get dinner on the table.
An average hog yields about 25 lbs. (12 kg) of chops, so I’ll have plenty of opportunities to riff off this formula!
How do you like your pork chops?
 I'm a science geek, food lover, and wannabe surfer.
Comments on this entry are closed.